I’ve been curious about the SAMD20 processors for a while now. They were originally produced by Atmel who have since been bought by Microchip. The SamD20 MCU’s are Cortex M0+ parts with the usual sorts of onboard peripherals. I was interested in programming this part from the ground up with my own header files, linker scripts and so on. Initially I had no success with OpenOCD (version 0.10 supplied with Ubuntu) so I went and downloaded a slightly more recent source code snapshot (0.10.0+dev-00382-gbe87994d). This mostly works. I can reset the chip, halt it, examine registers and program it using a slightly out of the way syntax. Single step debugging and breakpoints work too. The main problem is with the load command in arm-none-eabi-gdb: it just won’t program it. There is a workaround however as shown below. Note: I’m using an ST-Link-V2 clone to program the chip. The openocd configuration file is in the git archive for this project (see below).
In one terminal window type:
openocd -f samd20.cfg
In another type:
arm-none-eabi-gdb
Once inside gdb
target remote :3333
monitor reset halt
monitor at91samd chip-erase
monitor reset halt
monitor load_image /home/frank/Documents/samd/Baremetal/Blinky/main.elf 0
monitor reset
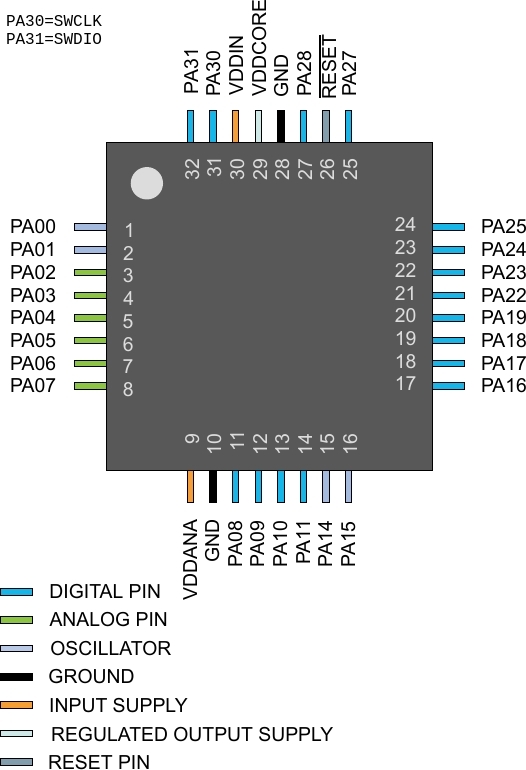
The debugger connects via SWCLK, SWDIO. VDDIN and VDDANA are connected to 3.3V and the various GND pins go back to 0V. The Reset pin is pulled up to 3.3V using a 10k resistor.
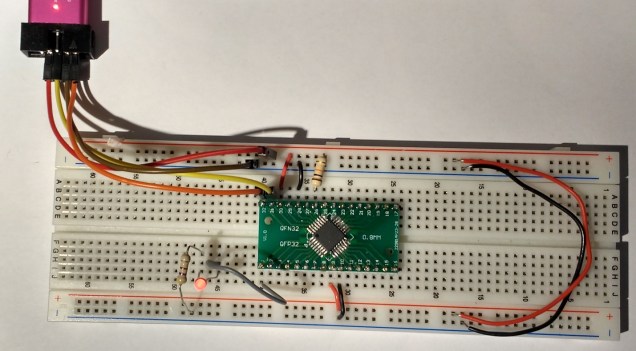
Higher resolution image
The blinky code is as follows:
/* User LED is on PA0 */
#include
#include "../samd20e16.h"
void delay(uint32_t dly)
{
    while(dly--);
}
int main()
{
    PADIRSET = BIT0; // make Port A bit 0 an output
    while(1)
    {
        PAOUTTGL = BIT0; // Toggle Port A bit 0
        delay(100000);   // Wait
    }
}
The header file samd20e16.h was written using peripheral addresses obtained in the datasheet.
The github repository is available here. I hope to grow this to include the other peripherals over the next week or two.

Blinking the LED with a delay loop is easy. The fun starts when you need to set up clocks on this chip. 😉
Interesting trick with OpenOCD. I gave up using the BlackMagicProbe and ST-Link very soon because they wouldn’t work reliably, especially when the MCU is spinning due to a mishap in the clock setup; a good trick to simplify your life is putting a delay loop before initialising anything so you have a small timewindow after power up in which nothing will interfere with the debugger. For this I settled on a DAPLink/CMSIS-DAP interface provided by the OpenSDA interface on a NXP FRDM-KL26Z board which works like a charm, but ALAS OpenOCD needs to be very recent and/or patched, too.
It’s very outdated and not really maintained anymore but if you’re interested, here’s what I have for this chip as Rust code: https://github.com/therealprof/atsamd20e15a
LikeLike
Thanks for the tip Daniel. That will indeed be my next step followed shortly by some serial comms. Interesting you’ve been using Rust. It’s on my to do list. Thanks again
LikeLike