
I have been using some SX1278 modules for LoRa experiments. The pin spacing on these modules is 1.27mm – half of the pin spacing found on a breadboard. Interestingly, ribbon cable is exactly the right pitch and I previously managed to solder a length of ribbon cable to a module however, the wiring was prone to fatigue and soon became unreliable. Rummaging around my parts drawer I came across a 24 pin SOP24 to DIP adapter board. This is the sort of board you use with surface mount SSOP chips when you need to work with them on a breadboard. The spacing between pins on the SSOP pins is exactly 1.27mm. These adapter boards are very cheap ( < 10c) and it they can be used with the SX1278 as shown above to make it breadboard compatible
Month: September 2017
ESP32 and LoRa

Hardware
The ultimate intention of this project is to set up a LoRa to TCP/IP gateway. I decided that the ESP32 would make a good bridging device and found one here for about €6. The LoRa transceivers were obtained from Aliexpress also and are available here. Interfacing with the ESP32 was pretty straightforward as the LoRa module simply connects to its SPI interface. The really tricky part was connecting up to the 1/20 inch pitch connector on the LoRa module.
Software
I decided to develop my own LoRa driver module for the ESP32. Its API is based on the equivalent library for Arduino (I felt it would be easier to deal with just one API). Code was developed using the ESP development environment and is available here
Sender
Every conversation needs at least two parties so a device was needed to send some test data to the ESP32 board. A Seeduino was connected to an SX1278 LoRa module as shown here:
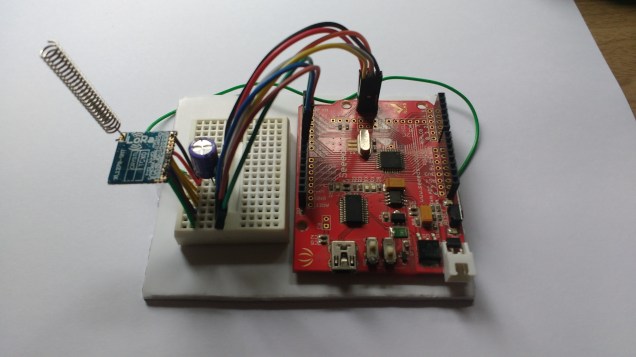
The great thing about the Seeduino is that you can switch its I/O to 3.3V which allows you directly connect it to the SX1278 module. The code (which makes use of the Arduino SX1278 library) is as follows:
#include <SPI.h>
#include <LoRa.h>

int counter = 0;

void setup() {
  Serial.begin(9600);
  delay(1000);
  //while (!Serial);

  Serial.println("LoRa Sender");
  // override the default CS, reset, and IRQ pins (optional)
  LoRa.setPins(7, 5, 6); // set CS, reset, IRQ pin


  if (!LoRa.begin(433123000)) {
    Serial.println("Starting LoRa failed!");
    while (1);
  }
  // The following settings should maximize reliability
  LoRa.setTxPower(20); // going beyond 10 is illegal
  LoRa.setSpreadingFactor(12);
  LoRa.setSignalBandwidth(125000);
  LoRa.setCodingRate4(5);
  pinMode(2,OUTPUT);
  Serial.println("Setup done");

}

void loop() {
  Serial.print("Sending packet: ");
  Serial.println(counter);
  digitalWrite(2,HIGH);
  // send packet
  LoRa.beginPacket();
  LoRa.print("hello ");
  LoRa.print(counter);
  LoRa.endPacket();
  digitalWrite(2,LOW);
  counter++;

  delay(4000);
}
Testing
The main performance measure I was concerned with was range as the data sizes were very small. The Arduino end of the radio link used the coiled quarter wavelength antenna supplied with the module. The ESP32 end used a straight quarter wavelength monopole. Range testing consisted of me walking around the neighborhood with the Arduino end in a bag while talking with my sons over the phone while they watched the ESP32 end. The ESP32 “base station” was located inside a house with foil backed insulation (which didn’t help). The testing was carried out in a suburban area with lots of houses, trees, cars and so on.
Results and discussion
The best range I managed to get was 770m (measured on Google maps). I suspect that this can be improved if I switch to dipole antennas and if I locate outside the foil envelope of the house. Watch this space 🙂
