
AliExpress supply a really tiny OLED display driven by an SSD1306 controller.
https://www.aliexpress.com/item/1pcs-0-96-white-0-96-inch-OLED-module-New-128X64-OLED-LCD-LED-Display-Module/32639731302.html
The actual display area is 25mm wide by 14mm high and has 128×64 pixels. Pixels can be white, yellow or black. The display connects to the host microcontroller over an I2C bus which greatly simplifies wiring.

Pixels are mapped to graphics memory as follows:
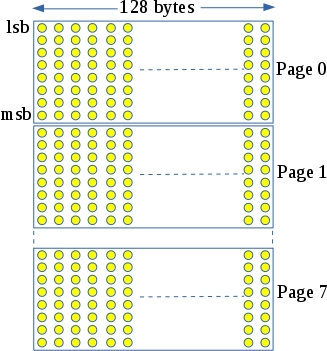
Each graphics memory byte controls a column of 8 pixels. 128 bytes cover a strip of 128×8 pixels or “a page” as its called in the data sheet. This display has 8 pages giving a resolution of 128×64 pixels. To set a particular pixel, you need to identify which page it is on and which byte and bit connects to it within this page. In theory you could then drive this pixel on or off as desired however there is a problem: graphics memory is written in byte-sized chunks so if you want to set a particular pixel, you need to read the byte connected to it, modify the bit in question and then write it back. Unfortunately, the I2C interface for the SSD1306 does not permit reading of graphics memory.
The Adafruit driver for this display gets around this problem by maintaining a copy of the graphics memory in the host MCU. It then updates the whole display when things change. This consumes a fair amount of RAM in the host MCU (128×8 = 1024 bytes) and is slow as the whole display must be updated if a single pixel changes.
My first attempt at controlling this display takes a different approach. The display is treated as a text only device capable of displaying 25×8 characters. Screen updates are carried out at page level i.e. 128 byte chunks are written at a time which corresponds to a single line of text. An I2C driver buffers this data and outputs to the display on an interrupt driven basis. This greatly reduces RAM consumption and speeds updates.
Programming and debugging
Openocd version 0.10 or later is required for the STM32L031. You may get this ready built for your OS or download the source and compile yourself. In my case, I downloaded the source from openocd.org. This was extracted and compiled as follows (as the root user):
apt-get install libusb-1.0-0-dev
./configure –enable-stlink –enable-maintainer-mode
make
make install
The STM32L031 was connected to the host PC using an ST-Link V2 clone and the debug/programming session was started this:
/usr/local/bin/openocd
-f /usr/local/share/openocd/scripts/interface/stlink-v2.cfg
-f /usr/local/share/openocd/scripts/target/stm32l0.cfg
GDB was then used to upload and test the program.
Source code
Source code is evolving and can be found here:
https://github.com/fduignan/stm32l031_examples
