The STM32F334 MCU has an ARM Cortex M4F core along with ADC’s, DAC’s and motor control timers – all of which are useful to me for DSP and motor control. My final intention is to design a couple of PCB’s around this chip so rather than buy a ready made board like the STM32F334 Discovery I decided to work directly with the bare chip.
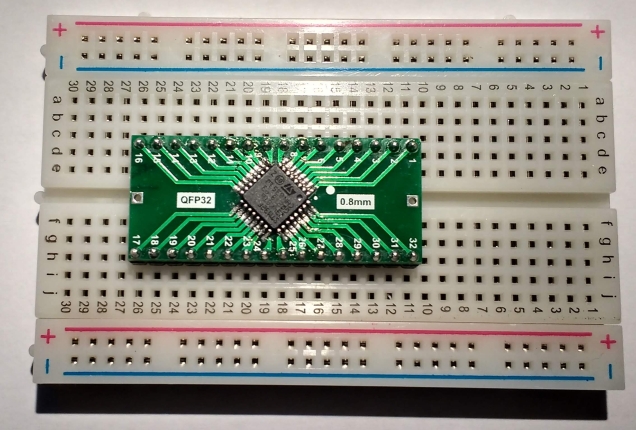
First task is to mount the chip on a breakout board so that I can use it with a breadboard.
Full size image
Some tips when doing this:
Have a good soldering iron that does not get too hot (I have an Antek 25W iron)
Have lots of liquid flux available and apply liberally
Have solder wick to hand to sort out the (inevitable for me) solder bridges
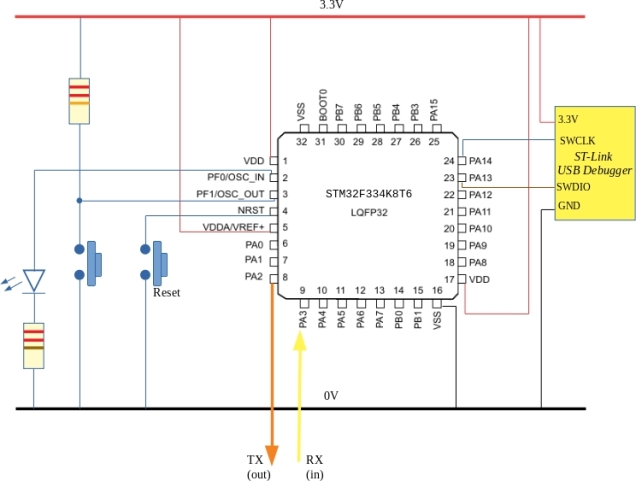
The circuit was wired as shown in the diagram above and is shown here:

I used an ST-Link clone from Aliexpress which costs 2 or 3 Euro.
In the past I have manually written header files for the various internal peripherals. ST Microelectronics provide a System Volume Description file which can be used with SVDConv to create a header file. This header file relies on other components from the ARM CMSIS libraries spread across various folders. I don’t like this so I added various dummy files (some with zero content) to the same directory as the generated header file. This allows me confine all header files to one directory and is completely standalone.
Having done all of this various examples were written and the code repository is over at github. This will grow over time but for now there are examples of blinky, systick interrupts, UART i/o and the ADC.
- Comment
- Reblog
-
Subscribe
Subscribed
Already have a WordPress.com account? Log in now.

This is exactly what I need but still confused. As in the bare metal ST Udemy courses, I use Keil uVision5 with just CMSIS core and Device startup platform. It works well for several ST ARM models but fails with the STM32F334. It fails at linker step because something is missing. If you could elaborate on how to setup and run Blinky, it would help.
LikeLike
Hi Ken. There are no library dependencies for blinky. All you need is to have the compiler in your PATH directory set. What error are you getting?
LikeLike
Here is the message window from uVision5:
compiling main.c…
main.c(13): warning: #1-D: last line of file ends without a newline
main.c: 1 warning, 0 errors
linking…
.\Objects\Null_Prog.axf: Error: L6320W: Ignoring –entry command. Cannot find argument ‘Reset_Handler’.
.\Objects\Null_Prog.axf: Warning: L6320W: Ignoring –first command. Cannot find argument ‘__Vectors’.
Not enough information to list image symbols.
Not enough information to list load addresses in the image map.
Finished: 2 information, 1 warning and 1 error messages.
“.\Objects\Null_Prog.axf” – 1 Error(s), 2 Warning(s).
Target not created.
Build Time Elapsed: 00:00:02
LikeLike
I meant to mention that this is for a “do nothing program” which should compile w/o error. I’m not quite sure what files I need to copy into uVision from your Blinky.
LikeLike
Ken, Keil has certain expectations when it comes to ARM programs (e.g. looking for the symbol Reset_Handler as you mentioned). GCC has no such “baggage” and if allows you use whatever names you like for interrupt handlers and vectors. Have you tried running the build script build.bat? Do you have arm-none-eabi-gcc installed?
LikeLike
I have used arm-none-eabi-gcc in Linux Mint when following Warren Gay’s book, “Beginning STM32”. I do not have it installed on my Windows 10 machine. I noticed it seems to be available in only 32 bit? I have bounced around different IDEs trying to find a good bare-metal one. I understand direct register writes but get lost in compiler options, linker script, makefiles, etc. What environment do you suggest for your GitHub package, Eclipse & arm-none-eabi-gcc?
LikeLike
Hi Ken, using a 32 bit compiler should not be s problem on Windows 10 (the PC’s at work are set up like that). I use arm GCC on Ubuntu with openocd for debugging. You can get the compiler here:
https://developer.arm.com/tools-and-software/open-source-software/developer-tools/gnu-toolchain/gnu-rm/downloads
If you simply want to download to the target you could use the stlink programmer from here:
https://www.st.com/en/development-tools/stsw-link004.html
As for an IDE I just use a text editor and the command line with GDB.
I can relate to your confusion over command line switches etc. I find IDEs can actually be a handicap here as they obscure lots. If I get time tomorrow I will see if I can put together a Windows 10 tutorial
LikeLike
Whoa! A lot of work on your part – thanks! I will give this a try. I’m actually a power conversion engineer so embedded programming is just a necessary sideline. The STM32F334 is ST’s version of a controller designed for complex PWM/ADC digital control loops. Both TI (Piccolo) and Infineon (XMC4200) have similar controllers. Thought I’d start with ST since I’ve programmed some of their other models.
LikeLike
Ken, just getting back to you about compiling and debugging on Windows 10. I gave it a try this evening using a “bluepill” board as I don’t have an STM32F334 to hand. The results should be the same for it however.
Download the compiler/toolchain from here:
https://developer.arm.com/tools-and-software/open-source-software/developer-tools/gnu-toolchain/gnu-rm/downloads
(I downloaded the file called: gcc-arm-none-eabi-9-2019-q4-major-win32.exe)
This was executed and it installed itself on my PC.
Next step is a little tricky. You need to set your PATH environment variable so that it points to the “bin” directory of the compiler you just installed. You do this by opening File-explorer, right click on “This PC”, choose “Advanced system settings”. Next pick “Environment Variables” and a list should appear. You need to edit the “PATH” setting. Add in a new component to the PATH variable : the full path to the “bin” directory. I cheat a little here and right-click on “arm-none-eabi-gcc.exe” in file explorer. You can copy it’s location from the dialog box that pops up. This is the new component for the PATH variable.
To test this open a *NEW* command window and type arm-none-eabi-gcc
You should see it complain that it has no input files. If you get a command-not-found type of error you need to go back and fix your PATH.
Next, download : openocd. I got it here:
https://gnutoolchains.com/arm-eabi/openocd/ and downloaded openocd-20200114.7z
Extract on to your PC somewhere and, for convenience, you should also add it’s bin directory to your system PATH as before (in this case copy the location of the file openocd.exe and add it to your path)
Finally! (all of the above is a one-time thing – you should not have to fiddle with the PATH’s again)
Download the sample code from github:
https://github.com/fduignan/stm32f103c8t6 for the bluepill board.
I just grabbed a zip file from there and unzipped it to a folder. Open a command window (CMD) in this folder and type this:
openocd -f openocd.cfg
If your board is plugged in it should connect ok.
Now, open a new CMD window and go back into the examples directory. I went for “Blinky” as this is the easiest example.
Run build.bat . This should compile the code in that directory.
If that went ok, run arm-none-eabi-gdb from the command line and enter the following commands:
target remote :3333
monitor reset halt
load main.elf
monitor reset
This should download your code to the target and stuff should happen.
You should note that you can stay inside arm-none-eabi-gdb for the rest of your debug session and even re-compile your code from within by typing
shell build.bat
Then repeat the upload procedure.
I hope this helps
LikeLiked by 1 person
OK, I stepped through your procedure and damned if it didn’t work! Thanks. Now, I have to crawl back through it to understand what I did. I will need to find tutorials on the various programs used and I need this to work on the STM32F334R8T6 so will try that next. Your effort is much appreciated.
LikeLike
That’s great Ken. Thanks for the feedback 🙂
LikeLiked by 1 person
I have not been able to move this process over to my Nucleo-F334R8 board. I run the command “openocd -f stm32f334brd.cfg” to set up the monitor (looks OK). Then I run build.bat in the Blinky folder. I modified main.c to toggle PA5. Here’s the command window history:
C:\Users\ken\Documents\STM32\Bare-Metal\stm32f334-master\Blinky>build.bat
C:\Users\ken\Documents\STM32\Bare-Metal\stm32f334-master\Blinky>arm-none-eabi-gcc -I../include -static -mthumb -g -mcpu=cortex-m3 *.c -T linker_script.ld -o main.elf -nostartfiles
c:/program files (x86)/gnu tools arm embedded/9 2019-q4-major/bin/../lib/gcc/arm-none-eabi/9.2.1/../../../../arm-none-eabi/bin/ld.exe:linker_script.ld:0: syntax error
collect2.exe: error: ld returned 1 exit status
C:\Users\ken\Documents\STM32\Bare-Metal\stm32f334-master\Blinky>arm-none-eabi-objcopy -g -O binary main.elf main.bin
C:\Users\ken\Documents\STM32\Bare-Metal\stm32f334-master\Blinky>arm-none-eabi-gdb
C:\Program Files (x86)\GNU Tools Arm Embedded\9 2019-q4-major\bin\arm-none-eabi-gdb.exe: warning: Couldn’t determine a path for the index cache directory.
GNU gdb (GNU Tools for Arm Embedded Processors 9-2019-q4-major) 8.3.0.20190709-git
Copyright (C) 2019 Free Software Foundation, Inc.
License GPLv3+: GNU GPL version 3 or later
This is free software: you are free to change and redistribute it.
There is NO WARRANTY, to the extent permitted by law.
Type “show copying” and “show warranty” for details.
This GDB was configured as “–host=i686-w64-mingw32 –target=arm-none-eabi”.
Type “show configuration” for configuration details.
For bug reporting instructions, please see:
.
Find the GDB manual and other documentation resources online at:
.
For help, type “help”.
Type “apropos word” to search for commands related to “word”.
(gdb) target remote :3333
Remote debugging using :3333
warning: No executable has been specified and target does not support
determining executable automatically. Try using the “file” command.
0x0800020a in ?? ()
(gdb) monitor reset
Unable to match requested speed 1000 kHz, using 950 kHz
Stlink adapter speed set to 950 kHz
Unable to match requested speed 1000 kHz, using 950 kHz
(gdb) load main.elf
Error erasing flash with vFlashErase packet
(gdb) monitor reset
Unable to match requested speed 1000 kHz, using 950 kHz
Stlink adapter speed set to 950 kHz
Unable to match requested speed 1000 kHz, using 950 kHz
(gdb)
LikeLike
Ken, it looks like you have an error in your linker script. Can you post it?
LikeLike
I see the Blinky linker_script.ld simply refers (../linker_script.ld) one directory up to linker_script.ld in stm32f334-master. Here is the contents of this file:
/* STM32F334K8T6 */
MEMORY
{
flash : org = 0x08000000, len = 64k
/* CCM RAM is not part of the same block so should not be used here */
ram : org = 0x20000000, len = 12k
}
SECTIONS
{
. = ORIGIN(flash);
.text : {
*(.vectors); /* The interrupt vectors */
*(.text);
*(.rodata);
*(.comment);
*(.ARM.attributes);
. = ALIGN(4);
} >flash
. = ORIGIN(ram);
.data : {
INIT_DATA_VALUES = LOADADDR(.data);
INIT_DATA_START = .;
*(.data);
INIT_DATA_END = .;
. = ALIGN(4);
} >ram AT>flash
BSS_START = .;
.bss : {
*(.bss);
. = ALIGN(4);
} > ram
BSS_END = .;
}
LikeLike
Ok Ken, I see what’s going on here. You need to copy the linker_script.ld file from the upper level directory into the directory where your code lives. This will replace the existing linker_script.ld which, as you noticed, simply links back to the file one directory up. The origin of this problem lies with the fact that I write my code on Linux. Linux allows me create symbolic links between files (similar to the concept of a Windows Shortcut). This feature of Linux is lost in translation when you copy to a Windows system.
One more thing I should mention: The examples on my github are compiled with the following command:
arm-none-eabi-gcc -I../include -static -mthumb -g -mcpu=cortex-m3 *.c -T linker_script.ld -o main.elf -nostartfiles
Note the “-mcpu=cortex-m3”. The STM32F334 has an M4 core of course. If you want to make use of the hardware floating point support (single precision only) of the cortex-m4 you could use this line to compile instead.
arm-none-eabi-gcc *.c -mcpu=cortex-m4 -mthumb -O2 -g -mfloat-abi=hard -fsingle-precision-constant -mfpu=fpv4-sp-d16 -lgcc -T linker_script.ld -Xlinker –cref -Xlinker -Map -Xlinker main.map -nostartfiles -o main.elf
For simple I/O programs it will make no real difference to the execution speed.
LikeLike
That appears to do the trick. I was able to download code and see the blink, change the code and see the new blink rate, etc.
I am able to recompile using “shell build.bat” and “shell arm-none-eabi-gdb” but the monitor didn’t like me trying to reload the code. Do I have to close the monitor window and reopen a new session? This is not a show stopper but saves a lot of typing starting from scratch each code iteration.
Anyway, things are looking good, just need to streamline things. A code editor with intelligent code completion is nice if it can be done here. Many thanks.
LikeLike
Just curious. Windows won’t let me look at the build.bat file but I assume it’s like a Makefile. Could it just as easily be a Makefile?
LikeLike
Ken, build.bat is just a text file. I can’t think why windows won’t let you view it. By the way, you shouldn’t run arm-none-eabi-gdb with the shell command as you are already running inside of it. Just do:
shell buil.bat
load main.elf
monitor reset
When you get more adventurous you could try debugging.
As for makefiles : yes they can be used and I’ve done so in the past. I like the simpler syntax of the build batch file though
LikeLike
Tried the new command sequence but loading main still failed. Here is the command prompt response:
(gdb) shell build.bat
C:\Users\ken\Documents\STM32\Bare-Metal\stm32f334-master\Blinky>arm-none-eabi-gcc -I../include -static -mthumb -g -mcpu=cortex-m3 *.c -T linker_script.ld -o main.elf -nostartfiles
C:\Users\ken\Documents\STM32\Bare-Metal\stm32f334-master\Blinky>arm-none-eabi-objcopy -g -O binary main.elf main.bin
(gdb) load main.elf
Error erasing flash with vFlashErase packet
(gdb) monitor reset
Unable to match requested speed 1000 kHz, using 950 kHz
Stlink adapter speed set to 950 kHz
Unable to match requested speed 1000 kHz, using 950 kHz
(gdb)
I could tell the modified code didn’t load as blink rate did not change.
LikeLike
Looks like openocd is having a problem with the hardware debugging interface. What’s it saying in the openocd window when you start up?
LikeLike
Here is the monitor window history including the failed reload:
C:\Users\ken\Documents\STM32\Bare-Metal\stm32f334-master>openocd -f stm32f334brd.cfg
Open On-Chip Debugger 0.10.0 (2020-01-14) [https://github.com/sysprogs/openocd]
Licensed under GNU GPL v2
libusb1 09e75e98b4d9ea7909e8837b7a3f00dda4589dc3
For bug reports, read
http://openocd.org/doc/doxygen/bugs.html
Info : The selected transport took over low-level target control. The results might differ compared to plain JTAG/SWD
none separate
Info : Listening on port 6666 for tcl connections
Info : Listening on port 4444 for telnet connections
Info : clock speed 1000 kHz
Info : STLINK v2.1 JTAG v35 API v2 M26 VID 0x0483 PID 0x374B
Info : using stlink api v2
Info : Target voltage: 3.247244
Info : Unable to match requested speed 1000 kHz, using 950 kHz
Info : Stlink adapter speed set to 950 kHz
Info : stm32f3x.cpu: hardware has 6 breakpoints, 4 watchpoints
Info : Listening on port 3333 for gdb connections
Info : accepting ‘gdb’ connection on tcp/3333
target halted due to debug-request, current mode: Thread
xPSR: 0x21000000 pc: 0x0800020a msp: 0x20002fd0
Info : device id = 0x10016438
Info : flash size = 64kbytes
Info : Unable to match requested speed 1000 kHz, using 950 kHz
Info : Stlink adapter speed set to 950 kHz
Info : Unable to match requested speed 1000 kHz, using 950 kHz
target halted due to debug-request, current mode: Thread
xPSR: 0x01000000 pc: 0x08000188 msp: 0x20003000
target halted due to breakpoint, current mode: Thread
xPSR: 0x61000000 pc: 0x2000003a msp: 0x20003000
Info : Unable to match requested speed 1000 kHz, using 950 kHz
Info : Stlink adapter speed set to 950 kHz
Info : Unable to match requested speed 1000 kHz, using 950 kHz
Error: Target not halted
Error: failed erasing sectors 0 to 0
Error: flash_erase returned -304
Info : Unable to match requested speed 1000 kHz, using 950 kHz
Info : Stlink adapter speed set to 950 kHz
Info : Unable to match requested speed 1000 kHz, using 950 kHz
LikeLike
BTW, just compiled and loaded the SerialADC example with no problems. It’s sending ADC readings to my serial port OK. But it has the same re-load error as Blinky. Great stuff!
LikeLike
That’s great news Ken. Have you tried stopping the chip before the load command with this:
monitor reset halt
It’s odd that it is reporting errors yet still programming. Could it be that the nucleo board has less than 64k of flash?
LikeLike
This change fixed the problem. Apparently, we just needed to reset the monitor. I will add the command “monitor reset halt” just before “load main.elf”. Thanks.
LikeLike
A quick question if I have not exhausted your patience. If I want to just compile and load a program to the target (no debug), what command is used after “build.bat”?
I noticed “load main.elf” is not recognized.
LikeLike
You may be able to use the stm32 flasher utility or you could make use of the mbed capabilities of your nucleo board and use a simple file copy command to program it. The output from build.bat is main.elf. if you covert this to binary format you should be then able to copy it to the fake disk drive presented by the nucleo board. I think the command is this:
arm-none-eabi-objcopy -O binary main.elf main.bin
The copy (programming) can be done by drag and drop in file explorer
LikeLike
I made up a test board much like yours except in the 48 pin package. I connected the ST-Link programmer to the SWDIO (PA13) & SWCLK (PA14), 3.3V and GND. I also put the 10K PD resistor on the BOOT0 pin. I have not been able to connect to this configuration to program it. I noticed you show a direct connection from the ST-Link dongle to the ST32F334 in your schematic. Is there a different format or configuration file needed for programming the chip directly via ST-Link?
LikeLike
The same config file should work. Did you connect all of the vdd and vdda pins ? I had a problem before if I tried to connect with vdda floating.
LikeLike
Bingo! Without tieing VDDA high, the reset pin cycles and the chip never gets going. Now it works. I should have paid more attention to your schematic. Also, your previous command suggestion (…objcopy) also works! You really know this stuff. I feel like I should send you money but don’t even know your name.
BTW, hand soldering a 0.5mm pitch LQFP48 package is impossible. If you ever need to do it, let me know, I can share my solder paste / stainless steel stencil / hot air reflow tricks.
LikeLike
That’s great news Ken. I’m Frank by the way. Greetings from Ireland 🙂
LikeLike
If I ever dare to solder an lqfp48 package you will be hearing from me. Thanks
LikeLike
Hey Frank, I noticed in your build.bat file that you generate a main.bin along with the main.elf so I can just copy that to the board drive after a bulld.bat command. No need to rerun the arm-none-eabi-objcopy command. I use this for quick, no-debug code updates.
OK, I admit I’m trying to reduce the labor of typing in long cd commands each time I start the process. I’m using the Atom editor and looking for ways to build and run from that environment. Need to better understand .bat files (or make files).
Happy St. Patty’s day!
LikeLike
I had completely forgotten about that bit in my batch file. Great! You may possibly be able to call the build.bat file from within atom as a custom build command.
Happy St Patrick’s day. ☘️
LikeLike
In power conversion one needs to use the high resolution timer (HRTIM) and the ADCs usually with synchronizing triggers and interrupts. When I try to expand the Blinky main.c to do this, the build.bat fails probably due to lack of supporting files. My attempts to copy various header files, etc., into the folder have not gone well. I have found other STM32 models are OK with just core CMSIS and a device startup file but the STM32F334 is not. Any thoughts on this?
LikeLike
I’ve used Tim1 timer for fast pwm on the stm32f103. It’s the same Tim1 that’s in the 334. (https://ioprog.com/2020/01/05/fast-pwm-on-the-stm32f103-bluepill/)
The main difference will be pin assignment. Is this the timer you intend using?
LikeLike
No, the high-resolution timer (HRTIM) is a completely different animal. It is poorly documented (in spite of ST’s “HRTIM cookbook”), especially with bare-metal code. I have done quite a bit with the regular timers but cannot master the HRTIM.
LikeLike
Hey Frank, hope you remain healthy. Quick question (you can ignore if I’m abusing the relationship). I have need to write directly to a peripheral configuration register (32 bit) because ST’s support file has a bug. I know the address (0x48000400 + offset) but not sure how to write the assignment (probably using a pointer). It seems like a simple question but searching the web was little help. What say yee?
LikeLike
Suppose the offset is 42 for example and you want to write the number 12.
int * register_ptr = (int *)(0x48000400+42);
*register_ptr = 12;
LikeLike
Thanks. The first * and the last * make sense to me (although they shouldn’t use the same symbol – confusing). The middle one is less obvious. We declare register_ptr as a pointer with the first * so it seems to me that we should just assign it the memory address, not a pointer to a memory address??? Anyway, thanks for the quick response.
LikeLike
What’s going on there is type-casting. Some C-compilers will complain if you assign an integer value to a pointer (as they are kind of different). If you type-cast by prefixing the value with a ( int *) you are basically telling the compiler to “treat the following number as a pointer and don’t worry about it”
LikeLike
I see what you are saying. When they list data types in C, they don’t usually include the “pointer” type – that’s my excuse and I’m sticking with it – ha!
LikeLike
Hi Ken, just flagging some updates to the GitHub code. There were some bugs in initClocks.
LikeLike
Thanks, Frank. I have moved on to the newer STM32G474 device and have successfully programmed the HR Timer to do phase-shift bridge PWM with synchronous rectification. I was able to stick with direct register writes except for the startup code which I got via CubeMX and Keil uVision5 (still a mystery).
LikeLike